Last Updated on 04/23/2024 by Glynn Willard
Is Uneven Tire Wear A Bent Axle?
It might be a bent axle. But it might also be worn-out shackles and bushings. Read on…
We genuinely thought we had a bent axle when our rear axle driver-side tire kept wearing out new tires on our Outdoors RV.
This seems to be a notorious problem for Outdoors RVs, which source their axles from Dexter Axle.
As we learned more about our bearings, suspension, brakes, and axles, we realized the uneven wear might not be the axle.
After replacing all of our bearings correctly with the help of our road hero, Steve, the wheels were still misaligned.
He suggested the abnormal wear might be the bushings and shackles on our MorRyde CRE 3000 suspension system.
If it is, you don’t need a new axle or an axle alignment.
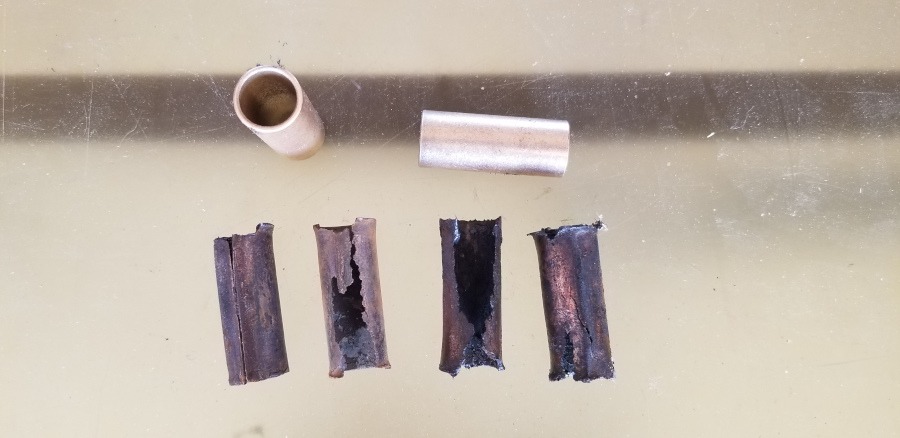
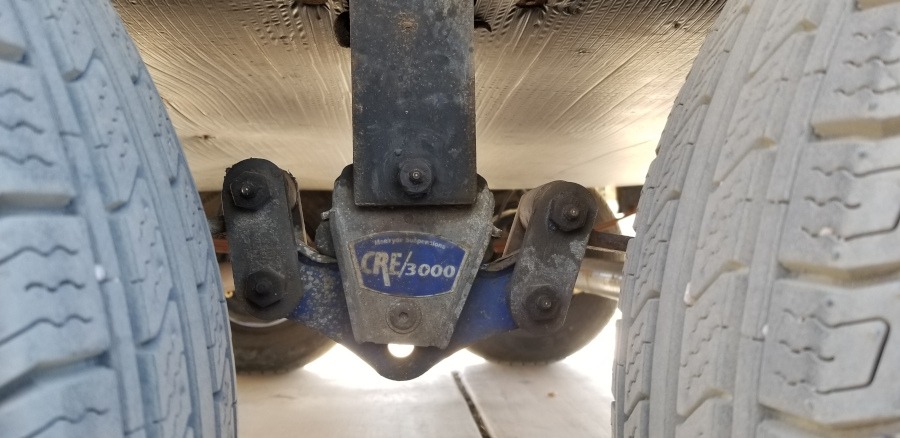
A picture of worn out bushings on the MorRyde CRE 3000.
An Overview Of The Steps To Replace MorRyde 3000 CRE
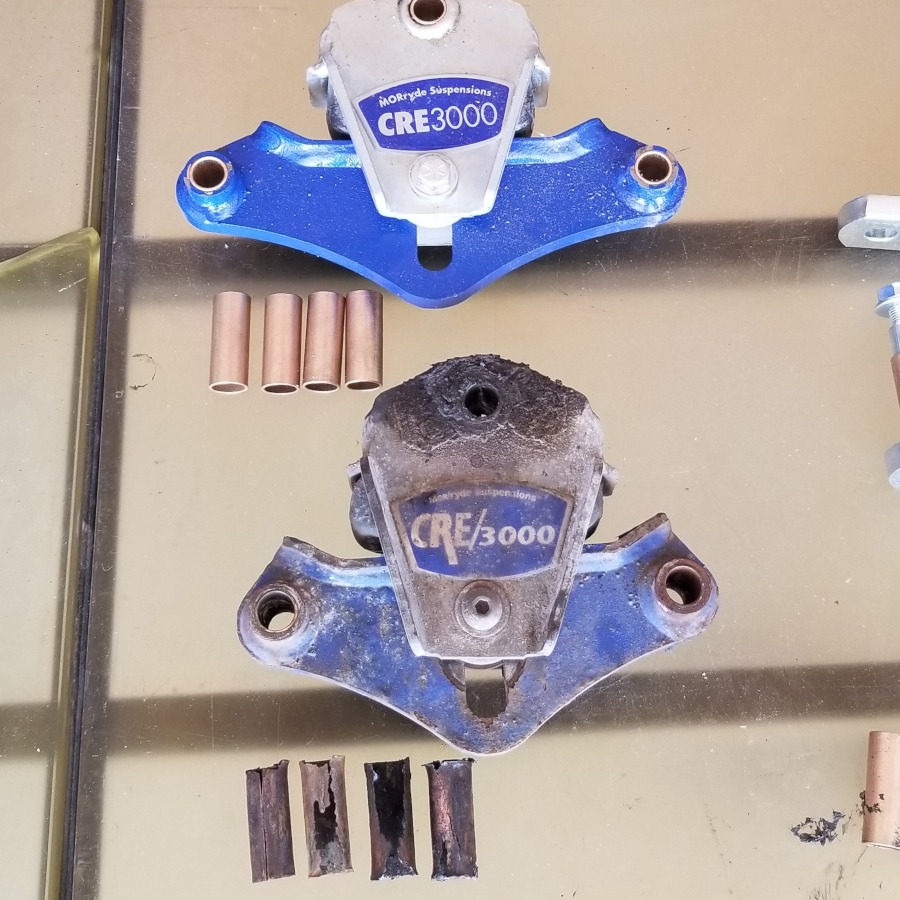
The new and the old MorRyde CRE3000.
Check out the video on the whole process below.
Possible Causes Of Misaligned Wheels On Trailer Tires
- It could be a bad or failing wheel bearing that causes misalignment on a travel trailer or fifth wheel.
- Worn-out bushings, shackles, or leaf springs can cause a misalignment.
- If any of the connection brackets on the frame are bent, you’ll experience a misalignment.
- Uneven loading for a long period can cause excessive wear on one side even if there are no other issues.
- A bent axle will cause a misalignment.
Another possible cause of irregular tire wear is improper tire pressure under load. Check this first.
Why you’re at, check your tow vehicle. It’s just good practice.
What Steps To Determine If It’s A Bent Axle?
Upon Steve’s suggestion, we made an appointment at at trailer shop to have the alignment checked. We did this even though we all agreed it was most likely the bushings.
The wheel alignment shop took one look and with a few choice words about our suspension system, agreed it was likely the bushings.
Of course, they offered to upgrade the suspension at a high cost and then align the axles only if it still needed to be aligned.
I thanked them and said I would replace the MorRyde system myself.
Is It Easy To Replace The MorRyde CRE 3000?
As long as you have some basic tools, the ability to jack the frame, and 1-2 days free, most “mechanically inclined” RV owners can do the job.
My number one suggestion is to bring a really big can of “patience” to this particular job.
So yes, you can likely do it yourself if you fit the criteria I just mentioned and you are very safety conscience.
What Parts To Order To Replace The MorRyde CRE 3000?
A few of the links below are affiliate links to help you identify the necessary parts. It also really helps us! Thank you!
The kit you order is dependent on the space between your axles. So make sure you have this information before placing your order.
The pictures below are affiliate links (they don’t affect your price) and are specific to our travel trailer. So make sure you select the size that corresponds with your RV.
Oh, and the shackle kit has all the parts for both sides. I made the mistake of ordering two.

What Tools Did We Use To Replace The Trailer’s Suspension?
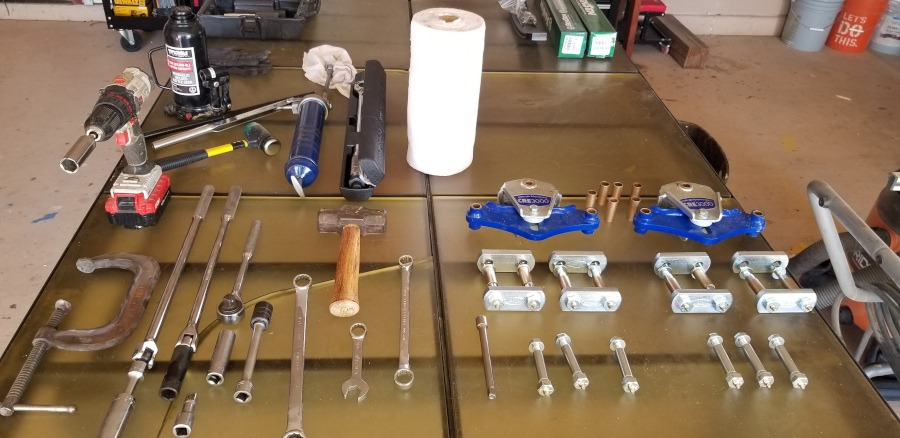
Tools used to change the MorRyde CRE3000 suspension system.
This is a long list of the tools we used. Some of the tools could be replaced with impact tools. But not everyone has an arsenal of high-end tools.
You can see a list of the tools on our Gear page. These are affiliate links that help us maintain our production, so we really appreciate you using the affiliate links.
- 12 ton bottle jack.
- Low profile 1-2 ton speed jack.
- Socket wrench
- Hacksaw
- Metal file
- C-Clamp
- Torque wrench
- Grease gun
What Steps To Replace The MorRyde Suspension?
We focused on doing the right side of the trailer first and then the left. The whole trailer was jacked on its frame before beginning.
Below are the steps we took to change the system safely.
- Safely jacking the frame is essential.
We placed large wooden chocks under each corner (close to the outside edge) with a jack stand on top.Then jacked each corner of the frame up, raised the jack stand, and rested the corner on the stand one at a time.
We did not go high enough to lift the wheels.
Instead, we used two-speed jacks to lift the trailer axles high enough to pull the wheels off (reminder to loosen the lug nuts first) after placing the frame on the jack stands.
Then we used the speed jacks to manipulate each axle to make working on the shackles easier.
- We set the speed jacks to raise the axle on the side being worked on just enough to ease the tension on the suspension system.
It didn’t take much lift to eliminate the tension on the suspension. - We broke the torque on the wet bolts holding the shackles and leaf springs.
Once the torque was broken and the nuts removed, we pounded out the wet bolts holding the leaf springs, shackles, and the CRE3000 “center piece.” - We began the process of removing the old bushings
I’d like to say this was easy.
Well, it was for a few of the bushing, but others were real work! The video will give a good idea of the methods used.
We had to resort to assembling a hack saw inside the leaf spring channel and cutting through some of the bushings that were corroded. It took time and patience. - We filed out any corrosion where the new wet bolts were to be placed.
We used a round metal file to bore out the holes for the wet bolts just enough for the new bushing to fit. Some of the holes required a lot of filing. Some required no filing. - We inserted the new bushing supplied with MorRyde’s mounting kit.
Once all the holes were bored with the file to the correct fit, we inserted the bushings. - The speed jacks were used to manipulate the leaf springs in an aligned position for the wet bolts.
It took a little manipulation with the jacks, but ultimately, it was the best solution to easily install the wet bolts. - Once all the nuts were on the bolts, we torqued them.
We torqued each wet bolt to 40-foot pounds of torque per MorRyde’s specifications. - Finally, we injected grease in each wet bolt until some came out on the opposite side.
- We raised the axles enough to reinstall each wheel.
After installing the wheels, we lowered the axle and torqued each wheel to 115 foot pounds of torque per ORV’s specifications. After 50 miles we re-torqued each wheel. - We repeated all the steps on the opposite side of the trailer.
- We did a tire rotation during this process.
- Lastly, we lowered each corner in the reverse direction that we raised the trailer (one corner at a time).
Why Is Steve, The Road Hero An Expert?
Steve spent over two decades maintaining the F-111 for the US Air Force.
He then spent another two decades preparing some of the systems used in the maintenance of the aircraft.
And when it comes to aeronautical maintenance, the FAA allows no room for error.
He treats every machine he operates and touches in as meticulous a manner as he would an aircraft.
The bottom line is we trust his knowledge.
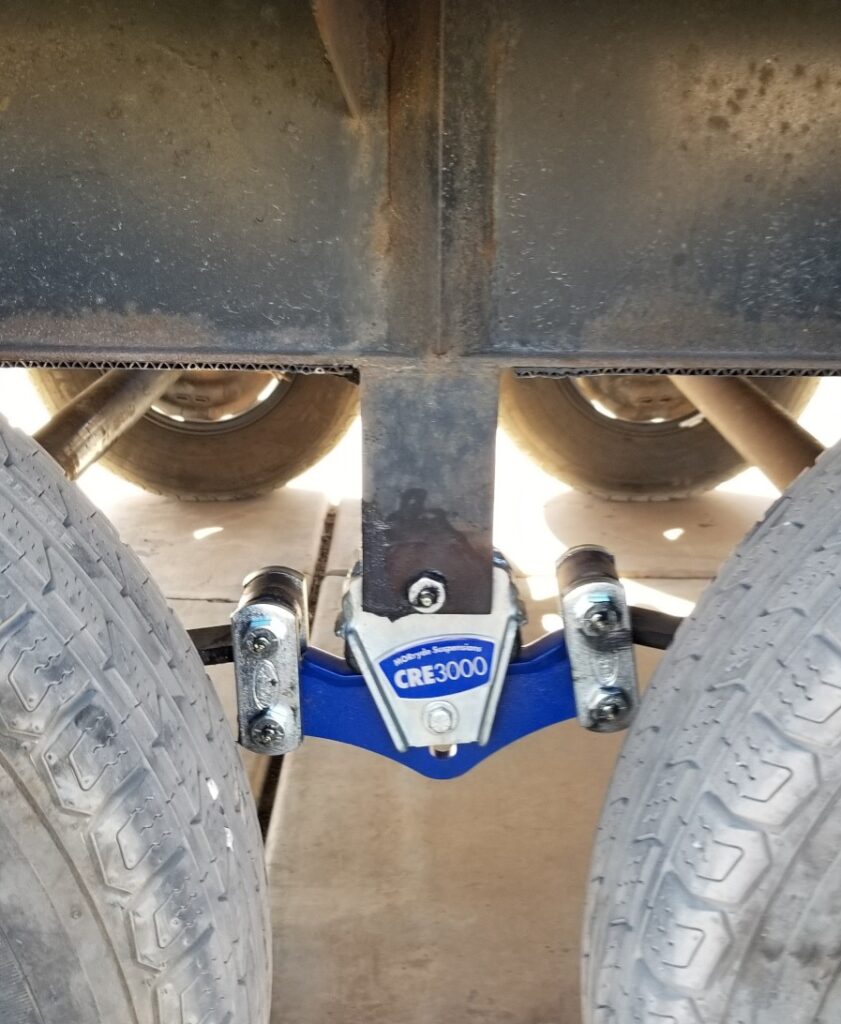
The New MorRyde CRE 3000.
Not Sure What You Need For Your RV?
What Preventative Maintenance Will We Do Going Forward?
First, we will we periodically check the alignment of the wheels with a straight edge. I’ll explain that method below.
Second, I will grease the Zerk fittings on the wet bolts periodically with the frame jacked up.
More often if we’re off-road a lot and less if it’s mostly smooth highway driving. Overkill won’t do any damage.
And last, I’ll make sure the wet bolts maintain 40-foot pounds of torque.
During these steps, it’s easy to do a visual inspection of the whole system.
How Can You Check The Axle Alignment On Your Travel Trailer Yourself?
See the video for a more detailed explanation
This applies to trailers with more than one axle.
You can do your own alignment check with a straight edge that reaches the edge of all the tires.
Line the edge up so that it crosses the center of the hub cover and runs along the outer sidewall of both tires.
If it makes contact with all four sidewalls and does not rock back and forth, your tires are in alignment.
But if it rocks and moves more than an 8th of an inch, you may have an alignment issue.
If you have a misalignment, start with a bearing check. Then check or replace the bushings.
If neither fixes the problem, then take it to a trailer alignments specialist.
If you take anything from this article, please stay on top of the maintenance of your trailer’s suspension system.
Happy and safe travels!
Meet the author.
We appreciate any help we can get to bring you great content. Donate or buy us a coffee on our Ko-Fi site.