Last Updated on 05/30/2024 by Glynn Willard
What are the first things to do with your new RV before hitting the open road?
Before embarking on your first RV adventures, go through these RV tips to get to know your new RV.
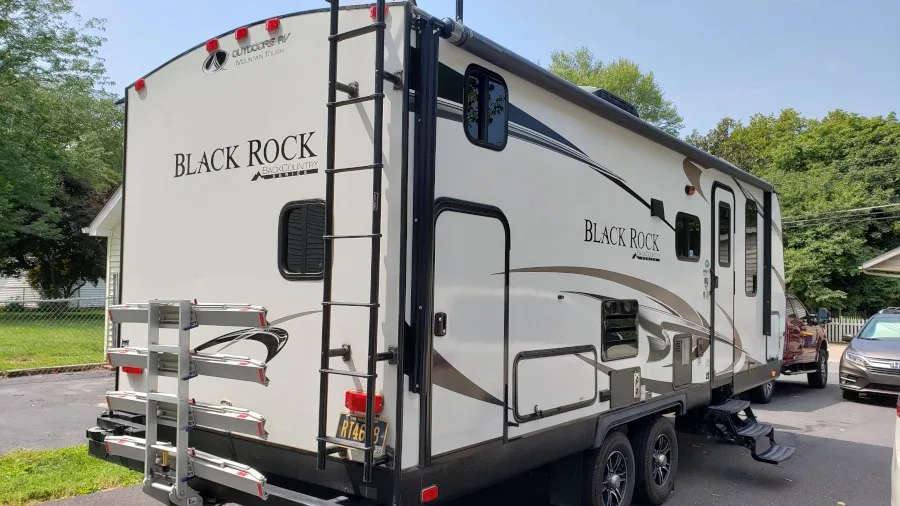
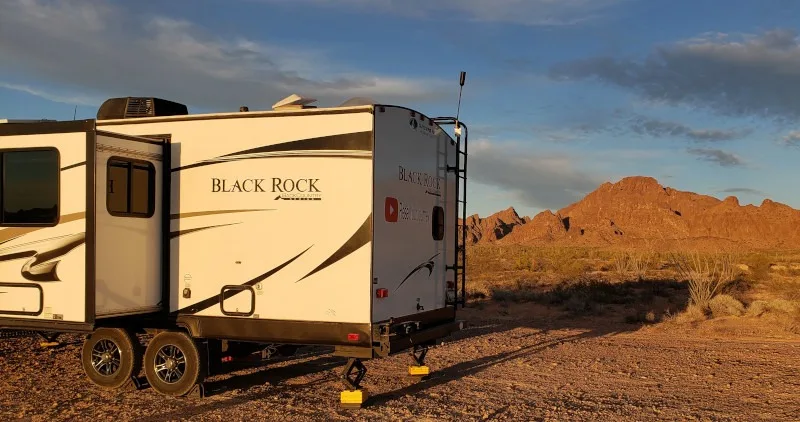
You just backed your new RV into your driveway and you’re new to the RV lifestyle. Now what?
After living in our travel trailer for close to two years and doing all our own maintenance, we developed a list for you to use to help prepare you for managing your new RV.
If you’re new RVers or new to the RV community, it can be confusing.
This guide applies to the general application of any type of RV.
Our and many first-time RV owners first question was where do we begin???
RV newbies can watch plenty of YouTube videos, but getting your hands dirty on your rig will help the most.
We hope this guide helps you get acquainted with the most important things and specific needs of your new RV.
I’m using affiliate links and photos to make it easier for you to a) know what I’m talking about and b) help you make an informed decision about essential items. We also appreciate the commission that does not cost you any extra.
How Should New RV Owners Use This List?
This is an extensive list of the important things and it’s a great start to prepare you for maintaining your rig before hitting the great outdoors and national parks.
After you bring your new rig home from the RV dealer, go through this first-time RV owner checklist and check off the boxes as you go.
You’ll complete some of the procedures in five minutes, other may take several hours.
So be prepared to spend several days getting to know your new travel trailer, fifth wheel, campervan, class A or class C motorhome.
When you’re ready for your first trip, it’s a great idea to review our RV camping checklist article.
Taking the time to go through this first-time RV checklist first is the best way to save you a lot of time in the long run and improve your camping experience.
Craving Video? Visit Our Channel

Getting Started With The First Steps For Your New RV
Read The Manual
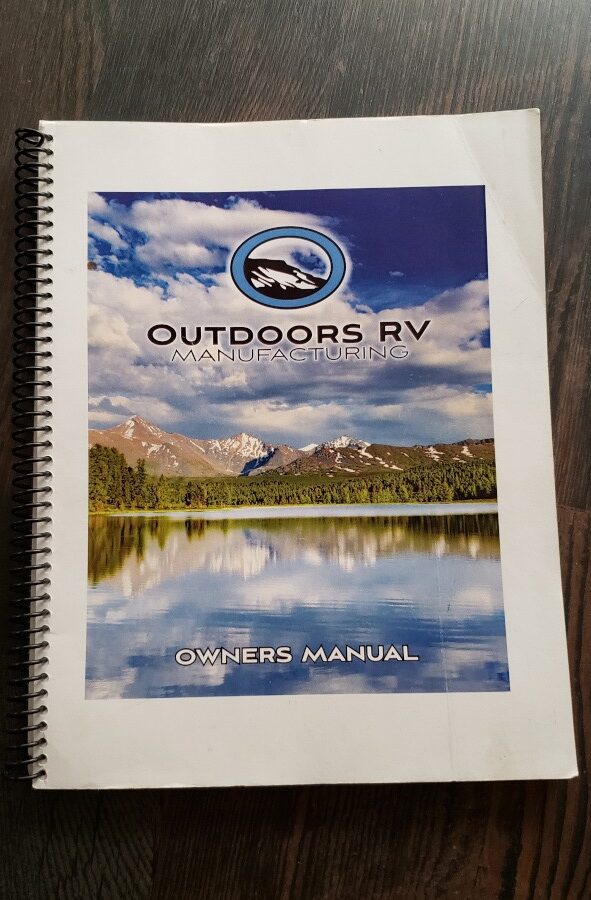
I realize this is obvious and it might take a while. Have it by your side as you go through this list with your RV as a reference.
I suggest also taking notes in the margins and highlighting important aspects.
Sitting down and reading the manual thoroughly after spending the day with your new RV is a great way to reinforce everything you learned.
Plug Your RV Into Shore Power.
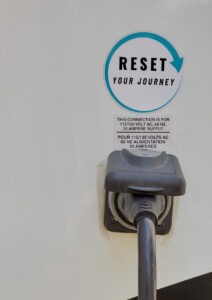
You’re going to need some power for several of these steps. If you don’t have solar panels, it will also keep your batteries charged.
It’s also an opportunity to make sure the AC outlets work as well as the overall electrical system before your first adventure.
If all you have is a 15 Amp outlet, that’s okay. It’s still enough to run the fridge or a small air conditioner (by itself) and charge the batteries.
If you don’t have an adaptor, you can easily find the right one for your rig.
Learn How To Use The Tongue Jack
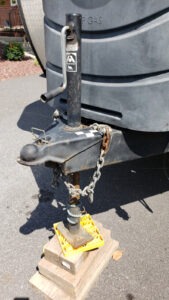
This is applicable to travel trailers. Fifth wheels use a different system with different options. And of course, if you have a motorhome skip this step.
Practice with the type of blocks that work best for you. We like multiple sizes of 2″x 10″ pieces stacked. There are plenty of aftermarket jack stands. It comes down to your preference.
You’ll get plenty of practice connecting and disconnecting to your tow vehicle, but familiarize yourself with the steps including tow chains and weight distribution systems before your first RV trip.
Put The Leveling System And Stabilizers Through Their Paces
If you have an automatic system, learn how it works. Take some time to grasp the control panel for the leveling system before your first camping trip.
If your trailer doesn’t have an automatic leveling system, you’ll need some manual gear to help you get level. Yes, you can use layers of 2″x 6″ wood, or you can use our favorite leveling blocks.
We like our Anderson leveling blocks (a lot). If you have them, start practicing. We give some great tips in our video, 6 TIPS for LEVELLING A TRAVEL TRAILER on UNEVEN GROUND.
Even if you have an automatic system, it’s a good idea to have a manual backup system. We’ve come across plenty of individuals telling stories about when their leveling system failed and it tarnished their camping experiences.
Turn On The Refrigerator
It will take several hours for your refrigerator to cool down to its set temperature. You want to make sure it works well while you’re still fresh in the salesperson’s mind.
Do a test run with your RV refrigerator with every power source that it will run on (DC, AC, or propane).
Photograph The Battery Terminals
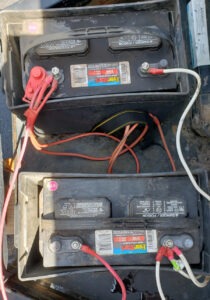
You’ll appreciate having a reference when you change the batteries. Stolen batteries are not an uncommon thing (sadly) and that usually means the “perp” cut the wires.
If you’re away from home, but can find replacement batteries, it will be nice to have a saved photo of where each wire terminates on the battery. Even if you have a broad understanding of electrical engineering, a picture can save you a lot time in the process.
Develop A List Of All The Tools You’re Using To Pack
Regardless of whether you live in your RV full time or just take it camping, some basic tools are essential gear.
While you’re going through this starter guide, make a list of the tools you’re using. Make them a permanent part of your RV tool kit. Reserve space in the storage areas for them.
Here’s a list of the tools we carry.
Take Out The Anode Rod
If it’s a Suburban water heater, the socket you’ll need is a 1-1/16″ socket, which you should keep in your tool kit. It’s not a common size found in most socket sets.
If your RV is brand new, the anode rod will look good, if it’s not new, it may be deteriorated a lot. Order a new one as a spare to always have on hand. A quick search online with the model number will find you what you’re looking for.
Many newer RVs have instant hot water heaters, which will not have an anode rod.
Freshwater Tank Vs City Water
If you plan on boondocking a lot, start using your freshwater tank (sanitize it first) since this is what you’ll live off of. Make sure you only use a potable fresh water hose from a safe water source. Figure out its capacity and how much weight it adds to the rig when it’s full.
You’re city water connection is what you use when you’re at a campground and want an endless supply of water. Use a pressure regulator since the park’s water pressure dictates the pressure on your rig’s plumbing.
If the RV park does not have a sewer at your site (not a full hook-up), be careful about using an endless supply of water. You’ll fill up your gray water tank in no time and have to go to the dump station. Under these circumstances, use your water tank. It will give you more control over filling your gray and black water tanks.
Sanitize The Fresh Water Tank
There are a lot of resources about how to sanitize your fresh water tank with bleach. And several different ratios of bleach to water. I haven’t seen anything that wouldn’t work.
If you use 1/2 cup per 30 gallons, fill the whole tank, let it sit for four or more hours, and run it through the faucets, it’ll do the job. Flush the tank and faucets several times, and you’ll be good to go.
You can learn more from our article Easy Way To Sanitize Your RV’s Fresh Water Tank.
The last thing you want is sickness resulting from a contaminated water tank. Ask me how I know!
Find The Water Pump
Generally speaking, the water pump is easy to access and close to the kitchen sink in most rigs. Find where it is and take a picture of the model number before your maiden voyage. If you will be living in your rig or on a long trip, carrying a spare is not a bad idea.
They’re not difficult to replace, but they can be difficult to obtain when yours fails in the middle of nowhere.
Being familiar with your water pump’s location and the wire connections can help expedite its return to working order if it fails.
Get To Know Your Sewer Hose
Practicing connecting the sewer hose and get familiar with how the system works first thing before your first trip to a dump station.
Open Every Cover Panel
Yes, get your screwdriver or drill out and take off every panel cover you can find. This way, you’ll be familiar with every system’s location. Again, better while you’re in the driveway than on your RV adventure.
Learn How To Bypass The Water Heater
Almost every system has a valve inline to send water away or to the water heater. If you just can’t seem to get your water heater to work, check this valve to make sure it’s getting water.
It will usually require the removal of a panel on the backside of the hot water heater located on the interior of the RV.
More modern RV instant water heaters do not need to be bypassed since they require winterization.
Run The AC, Heater, Fans, Microwave & Water Heater
That’s right, test every HVAC and water system in your new camper. Again, this is a good idea while you’re still fresh in the salesperson’s mind. It could save you a lot of money. In most rigs, your fans will run off the DC (batteries) system.
So, if your batteries are not charged, they will not work. Your air conditioning runs off the AC (alternating current) system. If you’re plugged into a 15 Amp plug (standard 110V outlet), it may not be enough to run your AC.
If you have a smaller AC unit, it will likely work, but turn everything else off first.
Check The Pex Connections And P-Traps For Tightness
Most rigs that leave the factory are not perfect. And loose plumbing is a common problem. I’ve encountered individuals who found out one of their P-traps was disconnected the first time they took a shower.
One of ours came loose once from all the bumpy dirt roads. Fortunately, we caught it before any damage occurred. Now I double check all the P-traps and PEX connections that are within reach.
Knowing the location of most of your water hoses can save you much time if there’s a problem on your first RV camping trip.
Jack Up The Rig And Change A Tire
I realize this is a pain, but do it anyway. The more comfortable you and a family member are with changing a tire on your specific rig, the better. Especially on the highway.
I’ve heard of individuals being sent home with their new rig and the spare tire didn’t fit the hub. This is an RV manufacturers error and can be easily corrected if you practice in the driveway before your next RV trip.
Learn About Your Suspension System
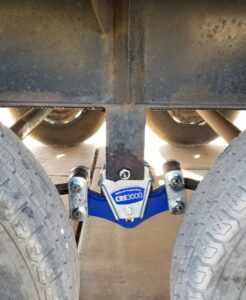
There are a lot of different systems on the market. Manufacturers (assemblers) use different variations, so make it a point to research the type of suspension with which your rig is equipped.
If it has wet bolts, buy a grease gun and learn how to grease them. It’s an easy process. Also, note that for the grease to make it all the way through, the pressure has to be off the suspension.
This means jacking up the frame on that side enough to release the tension. Again, an easy job with no additional cost. There’s no reason to pay an RV service shop for this job.
Learn What Your GVWR And CCC Are
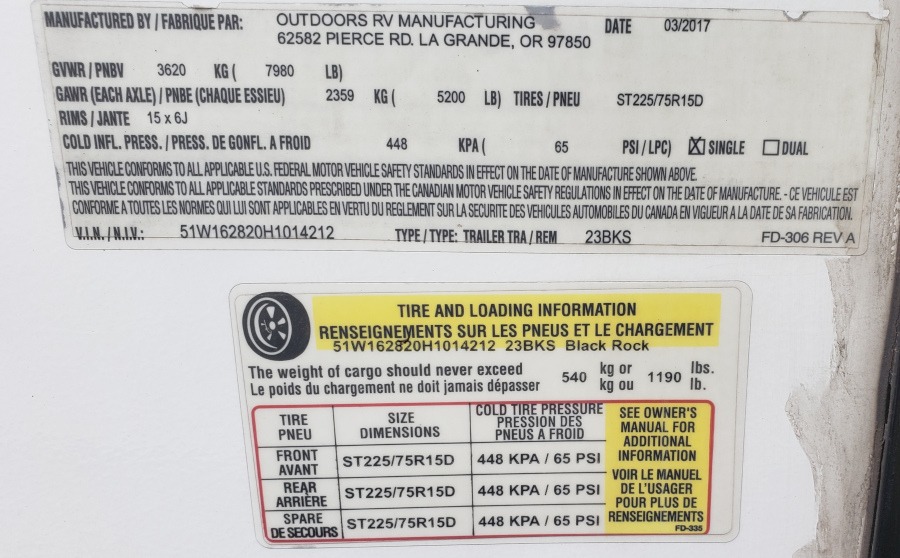
Your rig has a very specific number for its max weight. This is your GVWR. The difference between what your rig weighs empty and the GVWR equates to your CCC (cargo carrying capacity).
Getting your rig weighed when it’s full of the basic items is a very good idea, but not always convenient. So, at least figure out how much weight including water and additional features (solar panels, batteries, etc.) you can add to the rig before it exceeds GVWR.
Why? Overloading your rig erodes your stopping ability, overloads your suspension, contributes to tire blowouts, and accelerates the wear and tear on your RV.
Also, if you’re in an accident and it’s determined you’re overloaded, your insurance company may not compensate you (or anyone) for losses.
Check All The Seals
If your rig has a walk-on roof, get up there and inspect every inch of seals. If you see any breaks in the seal or potential breaks, reseal it. One of the last things you need is a leaky RV.
I use ProFlex and it seems to work fine. There are plenty of opinions on sealers, just find one you like and keep everything sealed on the top, sides, and bottom of your rig.
Get To Know Your Solar Panels And Batteries
Follow the electrical cords from your solar panels as far as you can and trace them through the rig. It’s good to know where everything is when and if there’s a problem.
Learn all about your charge controller, how it functions, and how it manages your battery charge. There are different settings for different types of batteries (AGM, lithium, etc).
If you have an inverter, read the manual for it and make sure it’s set properly.
Get to know your batteries and what kind of maintenance they require. Learn the voltage differences between a dead battery and a good battery. Also, find the temperatures for their best operating ranges.
Familiarize Yourself With The Propane Tanks
Removing propane tanks is an easy task on travel trailers. Most rigs have similar setups for securing your propane tanks.
I suggest removing one in the driveway, so you know what to do when you’re out on the road. It will also disclose if you need any helpful tools.
Learning how to easily and quickly switch between tanks is important. One tank tends to run out during “inopportune” times. If you already know what to do, it will be easy to switch in the middle of the night.
If your propane tank is a permanent fixture on your RV, learn how to have it filled and where you can have it filled.
Practice Backing Up The RV (Regardless Of The Type)
This goes without say. And it doesn’t matter if it’s a travel trailer, fifth wheel, or massive class A. They all come with their own set of challenges when backing up.
Even our Roadtrek campervan came with its own set of challenges when back it up.
You’ll perfect your skills while you’re out on the road, so spending hours in an empty parking lot is unnecessary. Just get the fundamentals down, so you know what to do in a tight situation.
Download Your RV Schematics To Your Phone
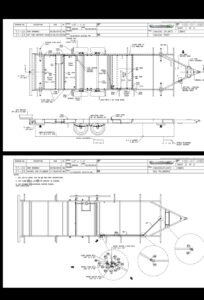
This is more important if you live in your rig and boondock frequently. There are times when you’ll be off-grid with no signal.
This is when it’s awesome to already have the wiring and plumbing schematics filed on your phone or laptop.
Like all suggestions in this article, this one comes from experience. We needed the plumbing schematics and were deep in the Saw Tooth Mountains with no signal. I had to leave camp, find a signal, email Outdoors RV, and await a response.
They got back to me on the same day with a PDF attachment of the schematics we needed. It would have been nice to already have that information in that situation.
If you ask nicely, most manufacturers will email you the appropriate information on your rig.
Know The Measurements Of Your RV
Measure your rig bumper to bumper and make a note of the measurements in your cell phone before your first road trip, so you don’t forget.
If it’s a travel trailer, measure from the tongue to the rear bumper.
Measure from the ground all the way to the top of the highest object on your RV. This is the number you need when you’re approaching a low overpass with a maximum height number. If it says 11′ 8″ and the tallest object on your roof tops out at 12 feet, your RV will not fit.
The best thing you can do is post this information on your dashboard, so you don’t forget it.
You don’t want to be in a situation where you have to assume your RV campers height.
Not Sure What You Need For Your RV?
Time To Get Out And Camp (Or Live)!
This is a great list for getting to know your RV in your driveway.
But your relationship with your “home away from home” will flourish when you’re using it to its fullest abilities.
Make sure your family members are also familiar with the systems on your RV.
Now you’re ready to learn more about your:
- Packing your RV
- Clothing packing ideas
- The right gear
- Essential tools
- RV checklist for hitting the road
Before you leave for your first trip, if you have a travel trailer, go through our article Travel Trailer Setup Checklist For Camping (Free For Phone).
What are some of the first things you have done with your new or new to you RV?
Happy and safe travels!
Meet the author.
We appreciate any help in bringing you great content. Donate or buy us a coffee on our Ko-Fi site. Or subscribe to our YouTube Channel.
Thank you so much for being here!